How to Introduce Bar Models in the Classroom: A Practical Guide for Elementary Teachers
Jump to: What is the Bar Model Method | First Lessons | 5 Steps to Introduce Bar Models | Asking Questions | Things to Remember | Common Mistakes | FAQs
A step-by-step guide to helping your students understand bar models, not just copy them.
If you’ve decided to teach the Bar Model Method in your classroom, give yourself credit. That’s already a big step toward helping your students become stronger problem solvers.
Maybe you saw bar models in a workshop. Maybe you noticed them in a textbook, or heard that Singapore Math programs lean on them heavily. Either way, you can already sense their value. What you’re really asking now is a more practical question:
How do I introduce bar models so my students actually understand them, instead of just copying the shapes I draw on the board?
This is the part where a lot of teachers get stuck, and I don’t blame them. On the surface, a bar model seems easy to teach. But doing it well takes more than showing students how to draw one. Students need to know what each bar stands for, how the diagram connects to the story in the problem, and how the model helps them think before they ever touch a number sentence.

In this guide, I’ll walk you through practical, classroom-tested steps for introducing the Bar Model Method to your elementary students.
Before we get into those steps, though, let’s quickly ground ourselves in what the method actually is and why it works so well.
What Is the Singapore Math Bar Model Method?
The Bar Model Method is a visual way to solve word problems. Instead of jumping straight into a number sentence, students first draw rectangular bars to represent the quantities in the problem.
These bar models help students see:
- part-whole relationships
- comparisons
- equal groups
- ratios
- fractions
- percentages
- multi-step word problems
For a closer look at the different kinds of bar models and when to use them, see Singapore Math Bar Model Method: A Complete Guide.
Instead of guessing what operation to use, students learn to look at the structure of the problem first. That single shift, thinking before calculating, is what makes the Bar Model Method such a powerful tool for building real mathematical reasoning.
But that shift doesn’t happen automatically. It depends heavily on how bar models are introduced in the first place.
Why the First Lessons Matter So Much
Here’s something worth sitting with: how you introduce bar models in those first few lessons often decides how far your students go with them.
If bar models are taught as diagrams to copy, students will produce tidy drawings without really knowing what those drawings mean. Over time, they’ll lean on you to show them the “right” model instead of building their own.
But when students learn that a bar model is a thinking tool, something shifts. They start noticing relationships between quantities before they even choose an operation. That’s the real goal: moving students from following steps to actually reasoning.
So don’t worry about covering every bar model type in your first few lessons. Your only job at this stage is to help students represent their own thinking through the bars they draw.
So how do you actually get there? Here’s a simple, five-step way to guide your students from that first word problem to a bar model they truly understand.
A Simple Five-Step Way to Introduce Bar Models
Step 1: Read and Make Sense of the Problem
Start by having the class read the word problem carefully, more than once if needed. At this stage, resist the pull toward “what operation do I use?” Just focus on understanding the story.
Step 2: Let Students Retell the Problem in Their Own Words
Once they’ve read it, ask a student (or a few) to explain the problem back to you in their own words. This tells you right away whether they understand the story and the relationships inside it. Ask a follow-up question or two if their explanation feels shaky.
Step 3: Build the Problem with Concrete Materials
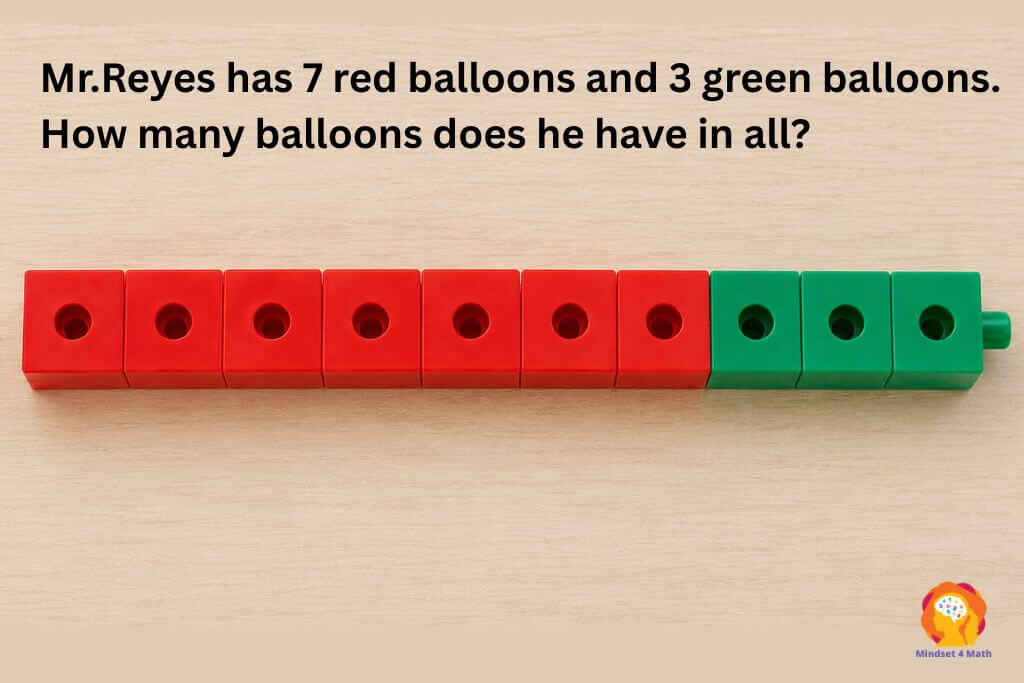
Before introducing bar models, let students build the problem using something concrete, like linking cubes. As they build, ask them to explain what each group of cubes represents. This hands-on step gives students something real to picture before they ever draw a rectangle.
Step 4: Move from Cubes to Drawings
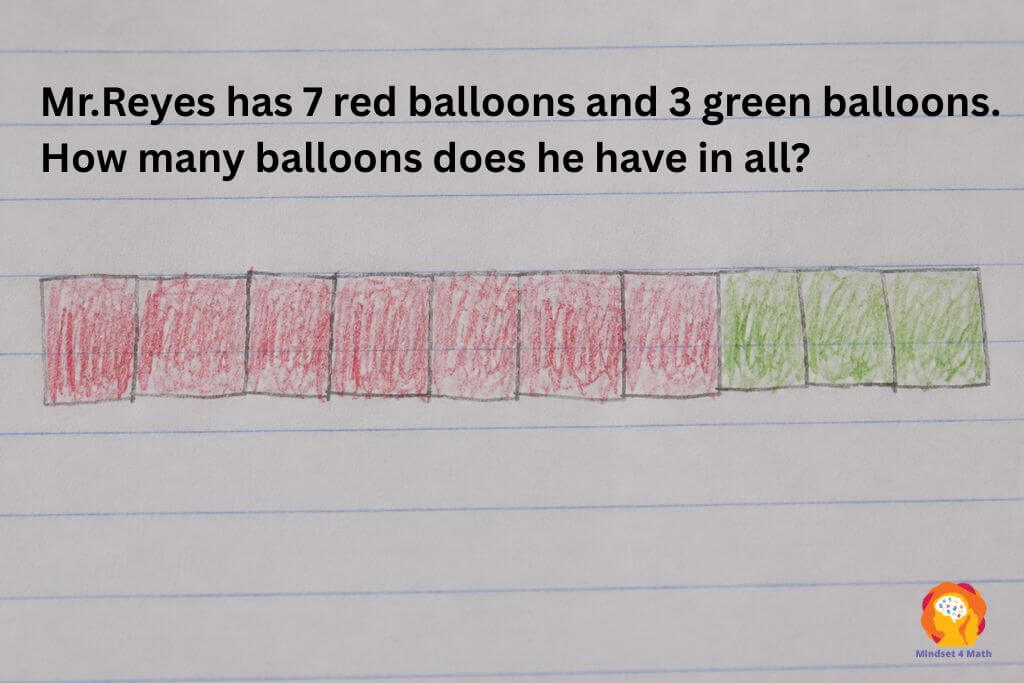
Once students feel comfortable building with cubes, guide them toward drawing what they built. Instead of using actual cubes, have them sketch the cubes on paper to match their model. If part of the problem is unknown, remind them to mark it with a question mark (?). This step, moving from concrete objects to pictures, is part of Singapore Math’s Concrete-Pictorial-Abstract (CPA) approach, and it sets your students up to handle bar models with confidence in the next step.
Step 5: Move from Drawings to Bar Models
Now comes the shift students have been building toward. Show them a faster way to represent the same quantities: instead of drawing seven red cubes, they draw one bar and label it 7. Instead of drawing three green cubes, they draw a shorter bar beside it and label it 3.
If there’s an unknown quantity, remind them to mark it with a question mark (?). This keeps their attention on what they’re actually solving for.
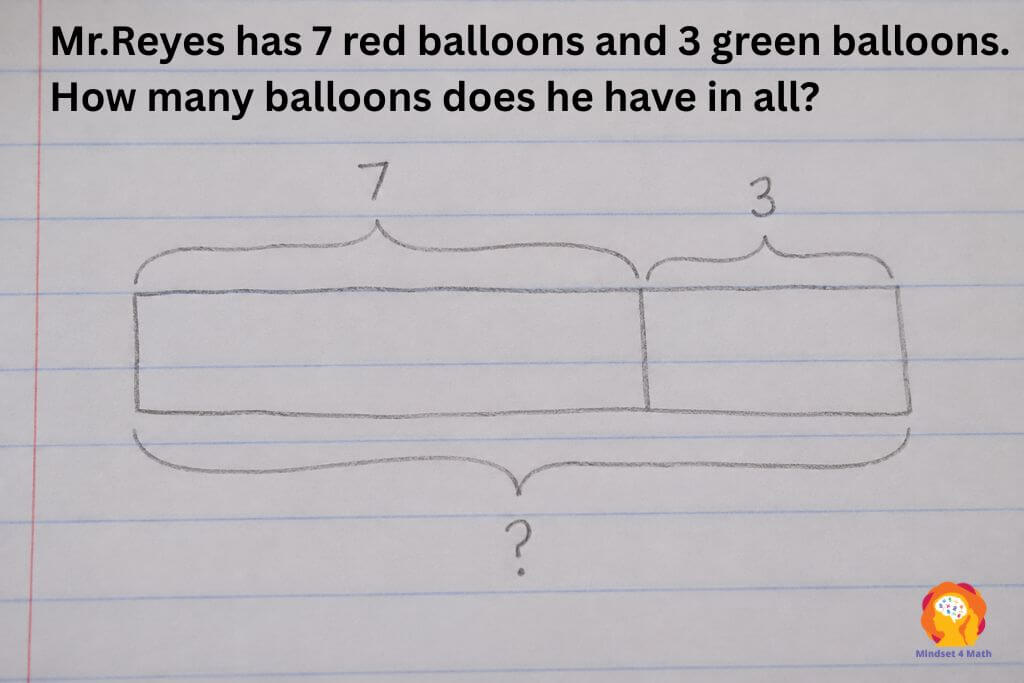
Make sure students understand that the bar still represents the whole quantity, just like the cubes did. Nothing about the math has changed, only the way it’s drawn. Once students see this, they’ll understand that a bar model isn’t a new or separate idea. It’s simply a quicker way to show the same thinking they’ve already practiced with cubes and drawings.
Once students reach this stage, the diagrams themselves are only part of the picture. What really shows you whether they understand the problem is how they talk about them.
Why Questions Matter More Than the Diagram Itself
Teaching bar models isn’t really about teaching students to draw. It’s about helping them understand what the problem is all about by drawing bar models to represent their thinking. The best way to check whether that understanding is really there is by asking the right questions along the way.
As students read the problem, build it, draw it, and eventually turn it into a bar model, keep asking them to explain their thinking instead of just handing you an answer. Their answers will tell you far more than a finished diagram ever could.
Try questions like:
- What is happening in this problem?
- What does this group of cubes represent?
- Why did you draw the bar this way?
- What does this part of the bar represent?
- Which quantity is greater? Which is smaller?
- Who gets the longer bar? The shorter bar?
- What does the question mark stand for?
- If we’re putting these two together, what’s happening? What operation is that?
- Can we compute now?
- Are we actually done solving the problem?
Notice how none of these questions ask “what’s the answer?” right away. That’s on purpose. These questions pull students toward reasoning first, and computing second.
This kind of questioning also works as an ongoing check on understanding. While students explain their thinking out loud, you’ll catch misconceptions in real time, like a quantity placed in the wrong spot, a comparison misunderstood, or an unknown sitting in the wrong part of the bar. Catching these early saves a lot of reteaching down the road.
One more thing worth remembering: a neatly drawn bar model doesn’t always mean a student understands the problem, and a messy one doesn’t always mean they don’t. Listening to how a student explains their model usually tells you more than the model itself.
At the end of the day, you’re not training students to become skilled diagram-drawers. You’re helping them build the habit of noticing relationships, representing their thinking visually, and solving problems with real confidence. The questions you ask are what make a bar model more than just a drawing; they make it a tool for thinking.
With that in mind, here’s what to keep close as you bring bar models into your classroom.
A Few Things Worth Keeping in Mind
Teaching the Bar Model Method well has less to do with how fast students can draw a bar and more to do with how deeply they understand what it represents.
Give understanding more weight than speed. Never rush a student through drawing a bar model. Let them read, think, and process. A model that took time to build is worth far more than one drawn in a hurry.
Make sure every part of the bar means something. Each bar, and each section of it, should stand for a real quantity in the problem. If a student can’t explain what a part of their drawing represents, they probably haven’t fully grasped the relationship it’s meant to show yet, and that’s useful information for you.
Start small before adding complexity. Begin with simple problem types before moving into comparisons, multiplication, division, fractions, ratios, and multi-step problems. A solid foundation makes everything that follows easier for your students.
Accept that students’ bar models may look different from each other. A correct bar model doesn’t have one single look. As long as the relationships are represented accurately, students can organize their diagrams in their own way. Use class discussions to compare different versions and talk through why each one works.
Keep the Concrete-Pictorial-Abstract approach close by. Bar models sit in the pictorial stage of this approach. Whenever a student struggles, it’s completely fine to step back to concrete materials or simple drawings before asking them to build a bar model again. Moving back and forth between these stages, rather than only moving forward, is what builds real understanding.
Use bar models often, not occasionally. Students grow more confident with bar models through regular use. Bring them into daily lessons, guided practice, and class discussions so students start to see them as a tool they can reach for anytime, not a special occasion diagram.
Remember what you’re really building. The goal was never neat diagrams. It’s mathematical thinking, plain and simple.
Keeping these principles in mind is a great start. It also helps to know where things tend to go wrong.
Keep parents in the loop when you can. If a student is taught to hunt for keywords at home while you’re teaching them to reason through bar models at school, the two approaches can work against each other. Sharing Why Children Struggle with Word Problems (and How the Bar Model Method Can Help) with parents helps them understand and reinforce the same problem-solving approach their children are learning in the classroom.
Common Mistakes Worth Avoiding
Even the best strategy can fall short if a few common missteps slip in. I’ve pulled together the ones worth watching for, so you can set your students up well from day one.
Waiting too long to start. Some teachers hold off on bar models until upper elementary, assuming younger students aren’t ready. In reality, students can start with simple bar models as early as Grade 2, using them for basic part-whole and comparison problems. Starting early gives students years to build the habit of visualizing relationships, long before they meet harder word problems. As they grow, the same strategy stretches naturally into multiplication, division, fractions, ratios, percentages, and multi-step problems, so there’s no need to wait for a “harder” moment to introduce it. The earlier the start, the more natural it becomes.
Skipping straight to bars. Because bar models look simple, it’s tempting to start there. But many students need the concrete step first, building with materials, before a bar model will mean anything to them. Following the Concrete-Pictorial-Abstract approach helps students see bar models as real quantities, not just shapes on paper.
Teaching students to memorize diagram types. Watch for students saying things like “this is the addition bar model” or “this is the subtraction one.” That’s just clue-word thinking wearing a different outfit. Instead, keep steering students back to the relationships in the problem, so they build the model that fits, rather than the one they memorized.
Judging the drawing instead of the thinking. A picture-perfect bar model doesn’t always mean real understanding, and a rough sketch doesn’t always mean confusion. Pay closer attention to how a student explains their model than to how polished it looks.
Rushing to the operation. It’s tempting to have students draw the model and calculate right away. Instead, pause once the diagram is finished. Talk through what each bar represents, where the unknown is, and what the relationships are telling you. Once that’s clear, choosing the right operation becomes almost obvious.
Not asking enough questions. If students copy a diagram without explaining it, you won’t really know whether they understand it. Keep asking them to justify their models, explain each part, and describe how the model helped them solve the problem.
Moving too fast into harder problems. Students need time with simple problem structures before you introduce multi-step ones. Resist the urge to speed up the progression. A strong foundation now makes fractions, ratios, percentages, and multi-step problems far easier to teach later.
Treating the bar model as the finish line. The real goal was never a well-drawn rectangle. It’s the reasoning underneath it. The bar model is just the tool that gets students there.
Avoiding these missteps helps bar models do what they were always meant to do: give your students a way to see math clearly, not another diagram to memorize.
Ready to Teach the Different Types of Bar Models?
Introducing bar models is just the beginning. As your students move into more complex word problems, you’ll want to know how to teach each bar model type and guide them through increasingly challenging structures.
For a quick reference on the different kinds of bar models, read the Singapore Math Bar Model Method: A Complete Guide.
The How to Teach Children the Bar Model Method On-demand Webinar gives you a complete framework for teaching problem solving, not just a quick introduction. Across roughly 3.5 hours of self-paced video lessons, you’ll work through addition and subtraction bar models, multiplication and division bar models, two-step and multi-step word problems, and more, with no prior experience required.
👉 Learn more about the on-demand webinar.
Looking for ready-to-use classroom practice? Once you’ve learned how to teach the method, reinforce it with the Singapore Math Bar Model Method: From Beginner to Advanced Level book. It includes carefully sequenced word problems, chapter tests, answer keys, and QR-code video solutions, ready for classroom instruction, intervention, enrichment, or independent practice.
👉 Explore the Singapore Math Bar Model Method book.
Frequently Asked Questions
1. At what grade level should I start teaching bar models?
Students can start learning simple bar models as early as Grade 2. Begin with basic part-whole and comparison problems, then add complexity gradually as students move through elementary school. Starting early gives students a consistent visual strategy they can build on year after year.
2. What should I do if a student draws an incorrect bar model?
Try not to correct the diagram right away. Instead, ask a guiding question, like “What does this bar represent?” or “Does this part match what’s happening in the problem?” More often than not, students will catch and fix their own thinking once they’ve had a moment to reflect.
3. Can bar models be used for topics beyond addition, subtraction, multiplication, and division?
Yes. While students usually start with those four operations, bar models also work well for fractions, ratios, percentages, and even early algebraic thinking. As your students’ understanding grows, the same visual strategy grows right along with it.
4. Do I need to be strong in math myself to teach this?
Not at all. With step-by-step resources like our e-book and on-demand webinar, both parents and teachers can learn the method alongside their students.
5. Can the Bar Model Method be used outside of a Singapore Math curriculum?
Yes. Even though it’s widely used in Singapore Math, the Bar Model Method is a problem-solving tool that works well with any math curriculum. Many teachers use it as a supplement, even when their school follows a different program.
Ready to Take Your Bar Model Teaching to the Next Level?
Keep building on what you’ve learned with the How to Teach the Bar Model Method On-demand Webinar, and strengthen your classroom instruction with the Singapore Math Bar Model Method: From Beginner to Advanced Level book.
✔ Learn the different types of bar models
✔ Gain practical classroom teaching strategies
✔ Access ready-to-use word problems for your students
Final Thoughts
Introducing the Bar Model Method is about much more than teaching students to draw rectangles. It’s about giving them a visual way to make sense of a problem before they ever start calculating. Taught thoughtfully, bar models help students move past guessing, chasing clue words, or picking an operation by trial and error. Instead, they learn to reason their way through a problem with real confidence.
As a teacher, how you introduce this method now shapes how your students will use it for years to come. By moving gradually, leaning on the Concrete-Pictorial-Abstract approach, asking good questions, and letting students build their own models, you’re laying groundwork that will pay off long after your students move on to the next grade.
Teaching bar models is a journey, not a single lesson. Start small, build your students’ confidence one step at a time, and celebrate the progress you see along the way.
Continue Your Bar Model Journey
You’ve learned how to introduce bar models. Now, build on that with resources designed to help you teach the Bar Model Method with real confidence.
🎓 How to Teach the Bar Model Method On-demand Webinar — Learn how to teach each bar model type with confidence.
📘 Singapore Math Bar Model Method: From Beginner to Advanced Level — Reinforce learning with carefully sequenced practice problems, answer keys, and QR-code video solutions.
